How that i had all my images i set about creating my interactive space using adobe dream weaver, this was quite monotonous but after a couple of hours i managed to finish it with completed captions, This is the link to the start: file:///C:/Users/joe/Documents/Uni/Design%20Practice%201/Interactive%20Space/Finished%20Interactive/index.html
I feel it works well, although some of the images are wrongly sized, but apart from that i like it. I tried to create one that had no demographic but after having some feedback it seems that was allot harder than i had thought.
Friday, 10 December 2010


Monday, 6 December 2010
Interactive Space: Storyboard
Now that I had all my ideas together I decided to draw up my storyboard this would show all the pictures I was planning to take and how they would link together with each other and in turn create my Interactive Space, I would have a focal starting point with two choices from these my story would be created each decision of the user would change the story but all would result in eventually the same outcome.


Interactive Space: Practice
Having storyboarded all my images for my interactive space and taken the images I decided to use Adobe Dreamweaver to practice linking some random images together so I as clear how I would need to go about creating my final piece, with help from Simon and a brief tutorial I chose 4 images from the internet all money images and decided that as a practice task I would play around with the images and hotspots in order to get a rough idea of how I would need to link my actual images when it came to it. These are two of the images I used for my practice interactive space, I didn’t really have a theme or any ideas behind it, it was more for the practice to teach myself how to confidently use Dreamweaver.

I found using Dreamweaver very easy, and with a template to work with i quickly was able to change the size and colour of my hotspots as well as changing there location, doing so I was able to create links from each image to the next which allowed me to work through a series of images with ease. Having done this i am ow very confident that when coming to complete my final Interactive Space that i will have no trouble in creating a fun and working story.

Interactive Space
Initial ideas:
Thought about doing a interactive space which involves the users, makes them take morale decisions which effect the overall outcome, this way it reflects the users personality. i decided to do a day in the life of for my interactive space having one main character which the story revolves around and the users will have to make a number of decisions throughout which will effect this characters day, essentially the user will be the character within the interactive space, because all the pictures will be POV shots.
It will start with the user having to make two choices for the character each leading to a different storyline, throughout the choices they make will affect the story later on, say if they are nasty to another character within the story later on that character might get their own back which essentially would disrupt the users day, also if the side with one character rather than another this might benefit them later on.
How?:
I plan to storyboard my ideas and decide of all the shots I will take and how they are linked together, all my shots will be POV giving user a personal feel within my story, will also decide to have a few morale options which will relate to the characters within the story and this will affect the overall outcome. I plan for the story to have an eventual goal something that the user is trying to get to, as well as this their needs to be interesting conflicts throughout to hold the users interest
My Station Indent
I have finished all my research and ideas for my own station indent and now I plan to put it all together using 3ds max. I've started with the idea of a football and my name being together in the animation and both moving to show what i have learned so far, it will also show how i have learnt to adapt shapes and create 3d objects. I began by creating my name i choice a simple arial text and the colour red for my name.

Having done this I proceeded to make it 3d by using the modifier tool extrude, using this i could make my name appear 3d and rotate it and place it where i wanted within the view tabs.
 Having my name in place and how I liked it I began to set about creating my football, I wanted this to be as realistic as possible. I began by creating a extended primitive, Hedra and then set about altering its parameters to dodec/icos, and its family parameters to 0.38 and its radius to 30, this gave me a basic starting shape for my football.

At this stage though it doesn't really look as realistic as I want to to, so the next step was to convert it to an editable poly, this would allow me to give it more detail in order for it to look a lot more like a football. Next I would alter its edges so I set about selecting all the edges and then by extruding them and changing the values to -1 for height and 0.3 for with it slowly begins to take shape. Having done this i could then set about tessellating my football. I selected all the polygons and then chose tessellate. Now I could add the Spherify modify to give my football its rounded shape.

Now that my football has taken shape all I needed to do was apply a meshsmooth modifier to give it a rounded look.

This is my completed football, now for my final task I would add some colour to in and then merge it with the earlier animation of my name and then i could begin animating.


Having done this I proceeded to make it 3d by using the modifier tool extrude, using this i could make my name appear 3d and rotate it and place it where i wanted within the view tabs.


At this stage though it doesn't really look as realistic as I want to to, so the next step was to convert it to an editable poly, this would allow me to give it more detail in order for it to look a lot more like a football. Next I would alter its edges so I set about selecting all the edges and then by extruding them and changing the values to -1 for height and 0.3 for with it slowly begins to take shape. Having done this i could then set about tessellating my football. I selected all the polygons and then chose tessellate. Now I could add the Spherify modify to give my football its rounded shape.

Now that my football has taken shape all I needed to do was apply a meshsmooth modifier to give it a rounded look.

This is my completed football, now for my final task I would add some colour to in and then merge it with the earlier animation of my name and then i could begin animating.

Thursday, 2 December 2010
Jelly Animation
Using 3ds Max we were given the initial task of animating the word Jelly, this was a sort of taster task for us to do which would allow us to lear how to use 3ds max. i had never used 3ds max before but straight away was intrigue and the endless possibilities that it gives you. We began by creating our word, using the command panel we were able to create shapes and then text, from this we were able to choose the font of our text and size.

 having created our word using Courier New Bold font, we could then begin to modify it, we began by using the etrude modifier, and were told to extrude it by ten segments this made our word 3d and stand out, we then added a bend modifier which we altered and different frames which would show and ive our word movement, we were told to bend the X-Axis in orderto make our word look as if it were jumping. By continuingly altering the degrees that our word would bend on seperate frames we were able to also alter the distance of Z axis which made the word rise from the floor, this together with the bendin made our jelly look as if it were jumpin up and down, i found this very useful and was a great starter for the animation pathway and it really intrigued me to explore and see what else i could do, as well as giving me some great ideas for an animation of my own.

 having created our word using Courier New Bold font, we could then begin to modify it, we began by using the etrude modifier, and were told to extrude it by ten segments this made our word 3d and stand out, we then added a bend modifier which we altered and different frames which would show and ive our word movement, we were told to bend the X-Axis in orderto make our word look as if it were jumping. By continuingly altering the degrees that our word would bend on seperate frames we were able to also alter the distance of Z axis which made the word rise from the floor, this together with the bendin made our jelly look as if it were jumpin up and down, i found this very useful and was a great starter for the animation pathway and it really intrigued me to explore and see what else i could do, as well as giving me some great ideas for an animation of my own.
Wednesday, 1 December 2010
Station Indent
For this assignment, we were asked to create a station indent animation using 3ds max, it would have to represent me. I have been thinking of ideas for what i could do for my for my indent and trying to decide what best represent me, i do really enjoy football so i think that would be theme would be best for me.

I hope to involve a cartoon football which is some way can produce my name or have my name relate to it, i am currently undecided. I thought it would be a good idea to research into current station indents to maybe get some ideas or techniques, this is a link to some past BBC:
http://www.youtube.com/watch?v=Tj44vZo2Pqk
http://www.youtube.com/watch?v=Tj44vZo2Pqk

In this clip there is alot of past station indents and i found it very useful, for ideas of my own. Alot of them are just 2d clips on the number two and the animation is done around the two and doesnt actually involve the two moving.
I decided this is how i would like to portray my own animation, have my initial theme of the football static in the centre and then come up with a way in which i can animate my name into the clip.
Developed thoughts: Having the football as the main theme of my animation, i would like the way that my name appears with the animation to relate in some way to the football. here are a few thoughts i have come up with...
- Name bounces like a football.
- Name zooms like a football being kicked.
- Name to come in letter by letter.
- Name to explode onto screen.
Thursday, 18 November 2010
Colour and Light
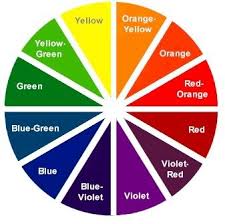
Colour Theory Isaac Newton 1642-1726, Newton did experiments where he refracted light into a prism to understand the rainbow, and developed the colour wheel in 1666. The eye perceives colour as reflected light, transmitted light. Light hits an object and it absorbs part of the spectrum. Electromagnetic spectrum has different wavelengths each producing a different colour in your optic vision.
Colour Wheel
Adjacent colours appear next to each other on the colour wheel.
Complementary colours are separated by another colour.
Clashing colours appear directly opposite.
Hue = Pure Colour
Tint = Hue + White
Tone = Hue + Grey
Shade = Hue + Black
hue describes the distinct characteristic of colour that distingushes red from yellow ad blue.
Saturation is the purity of colour-how much of that colour where 100 represents solid colour and value of 5 about 5% tint of that colour.
Value = Brightness, it can refer to the luminance, in terms of pigment the addition of black, lower the brightness closer to black it appears.
Tints/Tones/Shades = If white is added to a colour, the lighter the version is a tint. If the colour is made darker by adding black, the result is called a shade. And if grey is added, each graduation gives you a different tone.
On a computer red, blue and green are in a pixel to determine a colour o the scale of 0-255, 0 being white and 255 being black.
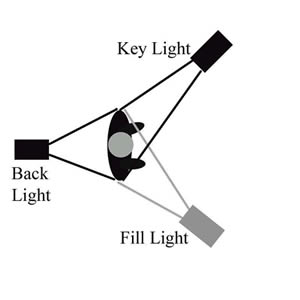
We also did a practice lighting exercise where we had to set up a 3 point lighting system and make it look like day light, the theme was interview so one person would be in front of the camera and be answering questions from someone of camera our task was to eliminate all shadows within the shot to give the effect of daylight, as a group we played around with many different lighting angles as well as changing the colour of the lights in order to give the effect we wanted.
Although we had done a number of shots we could'deem to remove all the shadows and our takes looked rather faded and plain, then with help from Deborah she said it was best to do each light one at a time in order to be able to see what areas the individual light was effecting, with her help we were able to do a take and give the impression of daylight, rather than being in a closed studio.
3 point lighting system:
Colour Wheel
Adjacent colours appear next to each other on the colour wheel.
Complementary colours are separated by another colour.
Clashing colours appear directly opposite.
Hue = Pure Colour
Tint = Hue + White
Tone = Hue + Grey
Shade = Hue + Black
hue describes the distinct characteristic of colour that distingushes red from yellow ad blue.
Saturation is the purity of colour-how much of that colour where 100 represents solid colour and value of 5 about 5% tint of that colour.
Value = Brightness, it can refer to the luminance, in terms of pigment the addition of black, lower the brightness closer to black it appears.
Tints/Tones/Shades = If white is added to a colour, the lighter the version is a tint. If the colour is made darker by adding black, the result is called a shade. And if grey is added, each graduation gives you a different tone.
On a computer red, blue and green are in a pixel to determine a colour o the scale of 0-255, 0 being white and 255 being black.
We also did a practice lighting exercise where we had to set up a 3 point lighting system and make it look like day light, the theme was interview so one person would be in front of the camera and be answering questions from someone of camera our task was to eliminate all shadows within the shot to give the effect of daylight, as a group we played around with many different lighting angles as well as changing the colour of the lights in order to give the effect we wanted.
Although we had done a number of shots we could'deem to remove all the shadows and our takes looked rather faded and plain, then with help from Deborah she said it was best to do each light one at a time in order to be able to see what areas the individual light was effecting, with her help we were able to do a take and give the impression of daylight, rather than being in a closed studio.
3 point lighting system:


One Shot Film, Shoot Day.
We had chosen our location for the one shot film and had all our ideas and plans wrote down, we met up at twelve o'clock on the Tuesday but found that due to the rain the previous day we couldn’t complete our filming, so we left it that day and hoped that by tomorrow that the path would of dried up. that night i decided to write up a new risk assessment in case that the path had not dried up, we had said that if this was the case we would film inside in one of the studios in the Waverley building. Luckily when we returned on Wednesday the path had dried up and we were able to shoot outside like we had originally planned, we set up shot inside the arboretum and straight away discovered that it was going to be a lot harder than originally anticipated, we found that with our original idea of shooting the one shot film from over becky’s shoulder that when she was drawing her head blocked most of the shot so our idea of her drawing out her life, the message we wished to portray didn’t work how we had hoped, after doing a number of different shot angles and zoom taking the best part of an hour we found a suitable shot that would allow us to portray the message we wanted, there was only one more proble that we had one attempt at our film and there wouldn’t be time for another take. Thankfully we set up and began filming, Bree and Sam stood watch to make sure no one walked into the shot, while Harry was on camera Becky starred and i was Director, we successfully shot our film packed up, and showed it the next day to the other groups and got some positive feedback. Here are some photos from the shoot. Here is our finished film....
http://www.youtube.com/watch?v=jvvZjMXE5Zs

http://www.youtube.com/watch?v=jvvZjMXE5Zs

Friday, 29 October 2010
One Shot Film, Practice.
Yesterday we began preparations for our practice one shot film, we were given instruction that the film could have to been made with the camera being static and that we were allowed only 1 move. Chris split us into group and we went out to choose our location. We had two options either the arboretum or the graveyard, we decided to go with the graveyard and began thinking of ideas, and few that floated about where either showing the life and death of someone. a chase scene through the graveyard, or the idea that we eventually settled on have the camera facing down a path and having our main character walking towards the camera and people running from the cameras pov, a sort of judgement day scenario, our main character would be oblivious to the goings on around him, e.g. screams and at one point someone will run towards him and try warn him but he just shuns them away. having come up with some initial ideas we met up the next day a hour early and put the finishing touches to our ideas.
Having all our ideas down and a good idea of what we wanted to do we set out with camera and filmed our scene, we recruited some people from another group so that we could have more people fleeing in the film, we found a suitable location waited for no one to be around and began filming, before hand we made sure everyone knew what they were doing and which direction to run in, we had to make sure each person also didn't stop running until they were out of shot to make it look realistic, Harry played the main role and slowly walked towards the camera ignoring the people around him, before hand we also filled in a risk assessment to make sure the area was safe. we were lucky enough that nothing went wrong and we completed our film in 1 take, and it received a good reception from Deborah and the other groups, it was a good taster into what the actually project will be like and we are now in the process with coming up ideas for our actual film.
Having all our ideas down and a good idea of what we wanted to do we set out with camera and filmed our scene, we recruited some people from another group so that we could have more people fleeing in the film, we found a suitable location waited for no one to be around and began filming, before hand we made sure everyone knew what they were doing and which direction to run in, we had to make sure each person also didn't stop running until they were out of shot to make it look realistic, Harry played the main role and slowly walked towards the camera ignoring the people around him, before hand we also filled in a risk assessment to make sure the area was safe. we were lucky enough that nothing went wrong and we completed our film in 1 take, and it received a good reception from Deborah and the other groups, it was a good taster into what the actually project will be like and we are now in the process with coming up ideas for our actual film.
Wednesday, 27 October 2010
Rule of Thirds
The rule of thirds is a compositional rule in visual arts such as painting, photography and design. The image in question should be divided into nine equal parts and that important parts, for example of a photograph should be placed on the lines or intersections. This is done because in creates more tension and energy within the photo as well as drawing the viewers eyes to the parts of importance. The photograph above demonstrates the rule of thirds, the horizon sits on the bottom most line and the tree is placed on the vertical right line. For the photograph to work it is not essential that the points of interrest sit on these lines but, any parts on the photo that wish to be made more direct to the viewer should sit near the lines. Here are some examples to display the rule of thirds in use.
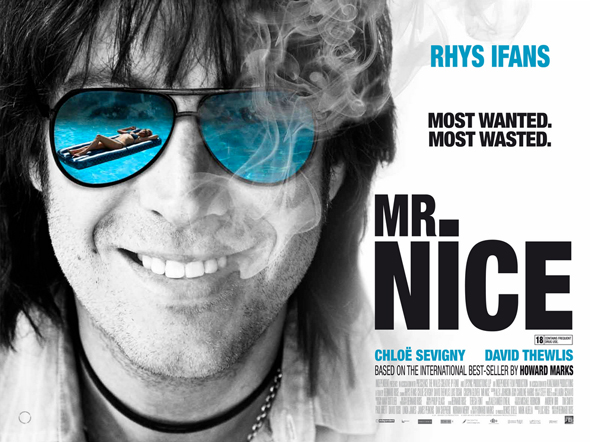
Mr. Nice
http://www.youtube.com/watch?v=eERUqYM8_zo
Last week i watched Mr. Nice at the cinema, it tells the story of Howard Marks and how he became the most wanted drug dealer in the world and is directed by Bernard Rose. It follows Marks (Rhys Ifans) as he grows up in Wales and is accepted to Oxford University this is where he has his first encounter with Marijuana and he begins to regular smoke it, before this stage though Rose uses clever medium close ups of Howard and teamed with Ifans' facial expression it shows a real shy side to the character his posture is always good and he is always polite, this shows how the drug smoking has a massive change on Howard as a character in the scene directly after his first encounter with drugs his posture has changed from up right, to laid back and relaxed his clothes have also changed and he is surrounded by women.
However after a accident with LSD he chooses to quit drugs and knuckle down and study, he successfully graduates and becomes a teacher with his girlfriend, putting drugs out of his life. Some years pass and he comes into contact with and old friend from Uni who is rich from smuggling and selling drugs, and a phone call from him 2 weeks later saying he wants Howard's help tempts him back into the game and he begins smuggling drugs from Europe and sells them in England. Howard begins to smuggle more and more drugs without any trouble, and makes more and more money, he comes into contact with Jim McCaan (David Thewlis) a Irish member of the IRA Rose uses a high angled close up shot here to add a sense of mystery to McCaan as we are not sure of his part within the film, However with his help Howard begins bigger deals and becomes more noted by the authorities.
As the film progresses the viewer follows the ups and downs that Howard encounters, from trouble with the law to buying homes across the world. What i enjoy about this film is how although in today's society drugs and portrayed and being very bad, but Rose puts the viewer on the side of Marks and you really want him to succeed and want him to become rich and not get caught. I think Rhys Ifans is perfect for the role of Marks he brings a real comedy to the film and makes it really enjoyable, although it starts off slow i think the film is a real feel good movie, and Rose uses some excellent close up shots of many characters to portray the role in the film, teamed with a good soundtrack which matches the pace of the movie, and think this film will be a hit
Buried

http://www.youtube.com/watch?v=j1Yyhxq56Xg
I recently watched Buried at the cinema and found it a very interesting film. directed by Rodrigo Cortes and starring Ryan Reynolds, it tells the story of a trucker who was hired to deliver supplies to troops in Afghanistan, however his convoy was attacked he was captured and buried alive held at ransom for £5 million dollars.
The film starts in complete darkness and only the breathing of Ryan can be heard as he regains consciousness, he breathing becomes increasingly deep and erratic realises the situation he is in. As the story unfolds he finds he has a phone with hi and receives calls from the terrorists who have buried him and manages to contact some help, the whole film is confined to the coffin Ryan is in and i think Cortes did a brilliant job in keeping the viewer and the verisimilitude going throughout the film, you are constantly on the edge of your seat with unexpected outcomes happening throughout the film.
Cortes using some very good camera angles to convey the claustrophobia of the coffin, Close ups are frequently used from all angles to show how small the area is as well as POV shots to put you right in the perspective and Ryan performs brilliant to make you believe he is actually in a desperate situation, also many ups and downs through the film happen when al hope seems lost Cortes adds another element to the move which could change it all round. the film draws to a close with the coffin slowly filling with sand and leaving the viewer hoping the the rescue team get to him in time.
With such a simple plot and a small budget i think the films performs amazingly and is up there with many of the big blockbusters, and i am looking forward to watching more of Cortes' work.
Subscribe to:
Posts (Atom)